
NextJS, Firebase, and Stripe Pricing Table Integration
Moving from Medium. Original Post Date: April 4th 2024.

Introduction
I wanted to incorporate payments into my existing NextJS + Firebase app (https://plans.quest), primarily so that users could upgrade from a “Free” to a “Pro” subscription.
The first and only choice that came to mind is Stripe, given its reputation and brand strength.
I signed up for a Stripe account and logged in.
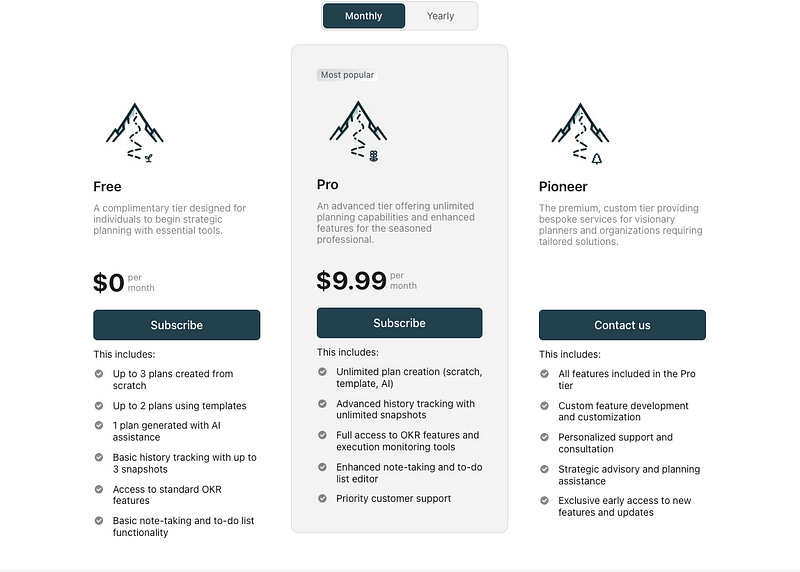
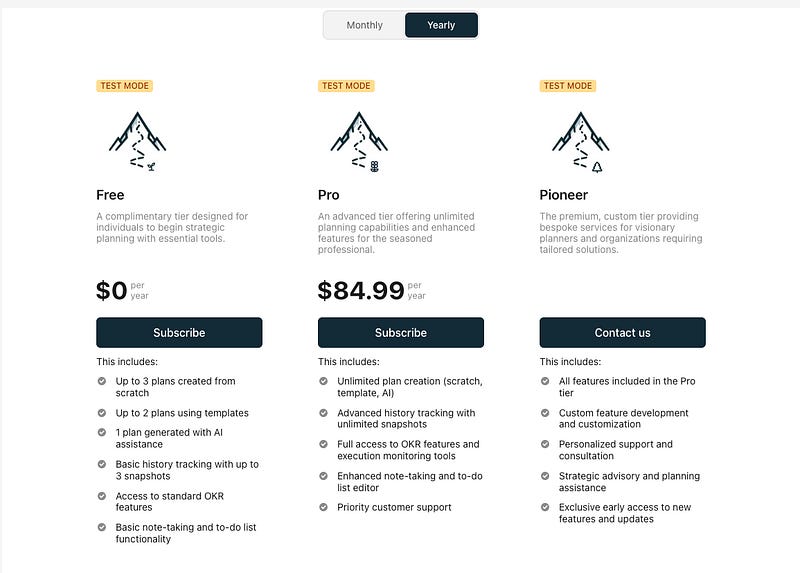
Pricing Plans
I was inspired by some pricing tables available on the web, for example, TypeForm. I realized later that this table UI was not built through Stripe…
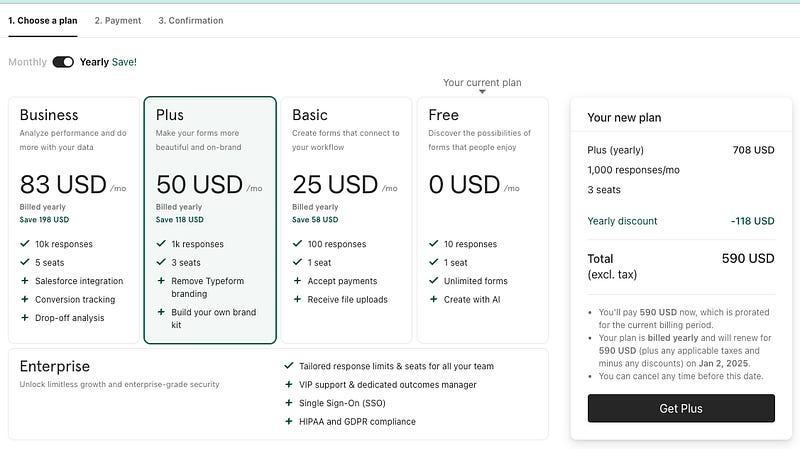
Anyways, I started in Stripe by exploring the Pricing Table.

I found the UI to be simple and it really helped me structure my thinking about what a pricing plan would look like for my app. I was able to put together a pricing plan very quickly.
You basically add products, and per product you define prices and other settings like logo, features, etc…
Tip: It was a bit tricky to figure out how to give users the choice to select between monthly or yearly plans, but then figured it was automatic as you add both the monthly and yearly prices to a product.
To save you time: I recommend you first start in “Test Mode” in the Stripe UI, so you have the option to copy the products over into the “Live” mode.
It was also nice to see the ability to add a “Contact Us” option that would point to a custom link.
Warning (for later): I really hoped I could disable or remove the “Subscribe” button on my free “Starter” product, but there was no way to do that. This limitation alone creates an inconvenient and confusing experience for my users, so I guess the way forward is to either remove the “Free” tier, live with the weird experience, or skip using Pricing tables altogether.
Integrating The Pricing Plan
My next natural step was to try integrating the pricing plan into both my app and its marketing website.
NextJS App Integration
My app is built on NextJS, React, Vercel and Firebase. I introduced a menu item for the user to “View Plans”.
On clicking “View Plans”, that same pricing table would show in a dialog. So far, easy.
import React, { useState, useEffect } from 'react';
import { Dialog, DialogTitle, DialogContent } from '@mui/material';

const StripePricingTable = () => {
  useEffect(() => {
    const script = document.createElement("script");
    script.src = "https://js.stripe.com/v3/pricing-table.js";
    script.async = true;
    document.body.appendChild(script);

    return () => {
      document.body.removeChild(script);
    };
  }, []);

  return React.createElement("stripe-pricing-table", {
    "pricing-table-id": process.env.NEXT_PUBLIC_STRIPE_PRICING_TABLE_ID,
    "publishable-key": process.env.NEXT_PUBLIC_STRIPE_PUBLISHABLE_KEY,
  });
};

const StripePlansDialog = ({ open, onClose }) => {
  return (
    <Dialog open={open} onClose={onClose} fullWidth maxWidth="lg">
      <DialogTitle>View Plans</DialogTitle>
      <DialogContent>
          <StripePricingTable />
        }
      </DialogContent>
    </Dialog>
  );
};

export default StripePlansDialog;
Marketing Site Integration
For my marketing site, I use Hugo, a free framework that gives me the power of full source control and is totally free. The hosting is also free on Firebase Hosting.
Integrating the pricing table was very straightforward, just a matter of including the <stripe-pricing-table> web component copied from Stripe.
<div id="pricing" class="w-full min-h-screen flex flex-col justify-center items-center bg-secondary-800">
    <div class="self-center text-center w-full xl:w-1/2 px-4 mb-8">
        <h2 class="font-bold tracking-widest text-gray-200 text-4xl mb-4">{{ $reg.Title }}</h2>
        <div class="font-light text-gray-400 text-xl">
            {{ $reg.Content }}
        </div>
    </div>

    <div class="w-full rounded mt-8">
        <div class="mb-5 bg-white">
            <br>
        </div>
        <script async src="https://js.stripe.com/v3/pricing-table.js"></script>
        <stripe-pricing-table class="mt-8" pricing-table-id="prctbl_1OSQRJGUlyEIrGMQsRYJgv7e"
        publishable-key="pk_live_51H…">
        </stripe-pricing-table>
    </div>


    <div class="flex flex-row w-full justify-center pt-6">
        <a class="px-10 py-2 text-gray-200 bg-primary-700 rounded-full shadow-md text-lg hover:bg-secondary-800 hover:border-red" href="https://my.plans.quest/" target="_blank">Get Started-it is free</a>
    </div>
</div>
Warning (for later): Ok, so now that the pricing table is integrated on my marketing website, what happens when a user makes a purchase, and how do I tie that with my backend to know who is the user that made the purchase?
Stripe Webhooks
When certain events occur in Stripe, such as successful payments, subscription changes, or failed transactions, Stripe can send webhook events in the form of HTTP POST requests to a specified endpoint URL on your server.
This is what we’ll rely on to have our app “register” a subscription purchase. Basically:
When a purchase is successful, I want to track that in my app so the user gets access to the “pro” features
When a user cancels a subscription, I want to revoke access to the “pro” features in my app
I have the option to create my endpoint (the Stripe webhook) as a NextJS API, Firebase Function, or rely on the Stripe Firebase extension. In this article, I’ll focus on the NextJS approach.
NextJS Stripe Webhook
Implementing Stripe webhooks in a Next.js 14 application to handle purchase completion, subscription changes, and cancellations involves a few steps.
We’ll basically set up API routes to handle webhook events and then update our Firestore database based on those events.
Let’s install both Stripe and Firebase admin libraries, along with the “micro” library to handle reading the raw request from Stripe and verifying its signature for security purposes. We’re working with payments here, so doing things securely is critical.
npm install stripe firebase-admin microNow, to the real deal, the Stripe Webhook API. Create a new file /pages/api/stripe/webhook.ts. Let’s start by just doing signature verification and logging the Stripe event type and its data.
import { NextApiRequest, NextApiResponse } from 'next';
import Stripe from 'stripe';
import { buffer } from 'micro';


const stripe = new Stripe(process.env.STRIPE_SECRET_KEY, { apiVersion: '2023-10-16' });


export const config = {
   api: {
       bodyParser: false,
   },
};


const webhookHandler = async (req: NextApiRequest, res: NextApiResponse) => {
   console.log('Received Stripe webhook');


   if (req.method === 'POST') {
       console.log('Processing POST request for Stripe webhook');


       const reqBuffer = await buffer(req);
       const sig = req.headers['stripe-signature'];


       let event;
       try {
           event = stripe.webhooks.constructEvent(
               reqBuffer.toString(),
               sig,
               process.env.STRIPE_WEBHOOK_SECRET
           );
       } catch (err) {
           console.error(`Webhook Error: ${err.message}`);
           res.status(400).send(`Webhook Error: ${err.message}`);
           return;
       }


       // Log the event type and metadata
       console.log(`Received Stripe event: ${event.type}`);


       if (event.data && event.data.object) {
           console.log('Event data:', event.data.object);
       }


       res.status(200).json({ received: true });
   } else {
       res.setHeader('Allow', 'POST');
       res.status(405).end('Method Not Allowed');
   }
};


export default webhookHandler;
Linking Stripe to The Local Webhook
Now that we have the webhook endpoint created in NextJS, let’s make sure our Stripe Pricing Plan in “test mode” is linked to our local NextJS endpoint we’ve just created.
To ensure that Stripe can communicate with our local Stripe webhook endpoint during development, we can use Stripe’s Command Line Interface (CLI). The Stripe CLI allows us to forward events from our Stripe account to our local development environment.
On the command line, let’s install Stripe CLI. On Mac (use installation method based on your OS):
brew install stripe/stripe-cli/stripeGrab the Test API key from Stripe.
Back to the command line:
stripe login - api-key <your copied secret>Then forward Stripe webhook request locally:
stripe listen - forward-to http://localhost:3000/api/stripe/webhookYou should see something like this in the Webhooks section in Stripe’s Developers dashboard.

Making a Purchase
Now, make sure your NextJS server is up and running, and let’s go to the Stripe pricing table in “Test Mode”, make a purchase, and see what happens in our NextJS logs.
Click subscribe on the “Pro” plan or whatever you have setup in your pricing table.
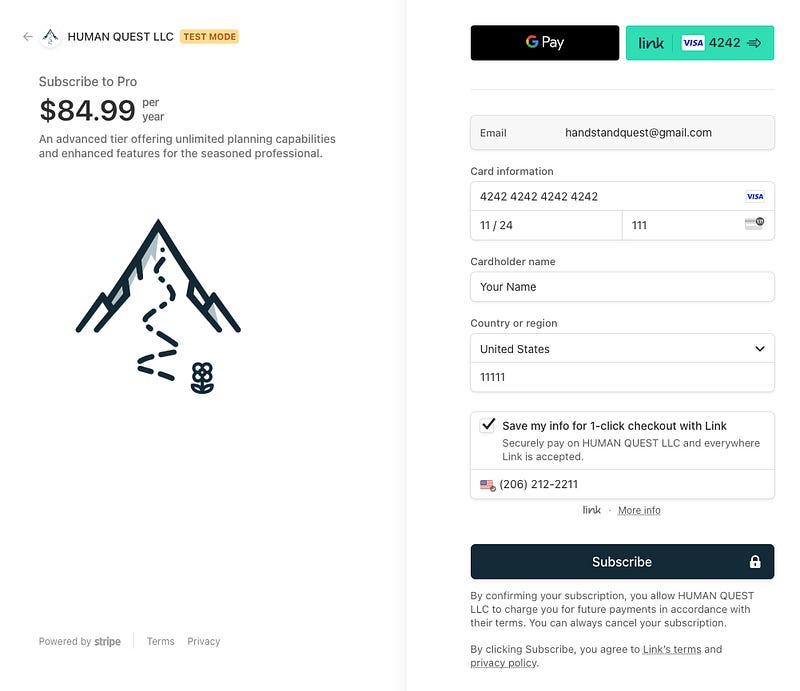
Use the 4242424242424242 test credit card number, any 3 digits for CVC, and any future expiry date. On clicking subscribe, payment should be successful.
Looking at the logs, here are the events emitted:
charge.succeeded: Occurs when a charge is successfully created.
payment_method.attached: A payment method (like a credit card) is attached to a customer.
customer.created: A new customer is created in Stripe.
customer.updated: The customer’s information is updated.
customer.subscription.created: A new subscription is created for the customer.
customer.subscription.updated: The subscription is updated, which can happen for various reasons, like a change in plan.
payment_intent.succeeded: The payment intent (for capturing payment) succeeds.
payment_intent.created: A new payment intent is created.
invoice.created: An invoice is generated for the subscription.
invoice.finalized: The invoice is finalized and ready for payment.
invoice.updated: The invoice is updated.
invoice.paid: The invoice is paid.
invoice.payment_succeeded: The payment for the invoice succeeds.
checkout.session.completed: The checkout session is completed, typically indicating the whole process of subscribing is done.
Our most interesting events are customer.subscription.created and checkout.session.completed.
Changing a Subscription
If you go back to the pricing table and click subscribe, this time it will tell you that you’ve already made a purchase. I think I turned on a Stripe setting to enable this behavior. It will then send you a link over email to manage your subscription.
Let’s update the plan. Let’s say I go from a “Pro” product to a “Free” product.

When that happens, here are the events that get triggered (for informational purposes).
customer.updated
customer.subscription.updated
invoice.created
invoice.finalized
invoice.paid
invoice.payment_succeeded
invoiceitem.created
Most relevant event here is customer.subscription.updated.
Canceling a Subscription
Same steps as “changing plan”, but instead we “Cancel Plan”.
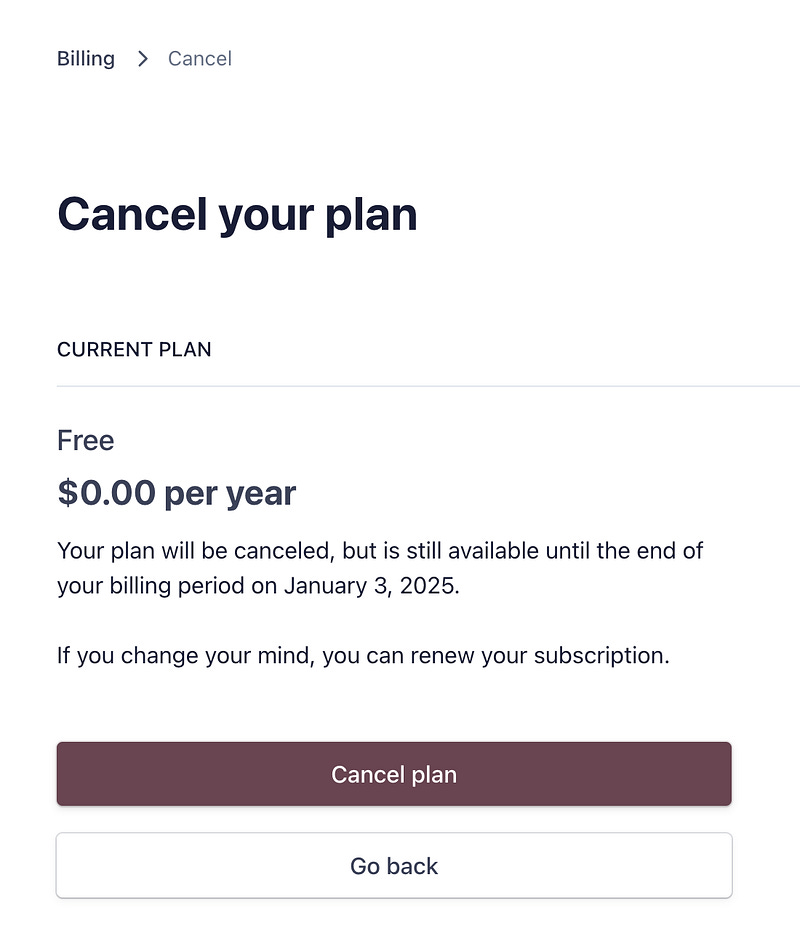
On cancellation (pre-confirmation), here are the events that get triggered.
customer.subscription.updated
After confirming, we also get that same customer.subscription.updated event!
Linking Stripe User to Firebase User
Ok great. So how do I know which user made the purchase and accordingly flag that in my system?
Looking at the logs, I’ve noticed the user email is included in most of the event objects. Using the email as an identifier could work both in the Web App and from the marketing website, given that an email is provided when a user makes a purchase.
However, since Stripe does not enforce uniqueness of an email address per customer, I’m playing it safe like a typical developer, and as a result, will rely on the User ID from Firebase to link between the user in Firebase and the customer in Stripe. So how do I go about doing that?
Luckily, the <stripe-pricing-table> web component supports setting the client-reference-id property. When the property is set, the pricing table passes it to the Checkout Session’s client_reference_id attribute to help us reconcile the Checkout Session with our internal system.
Side Note: Ok, so I’m deciding to drop the idea of using the “Pricing Table” for purchases on the Marketing website. It’s just not practical (no way to pass user id ). It would have been nice to let me just put it there for informational purposes without any buttons, but that’s not possible either.
I’ll focus on the integration of the pricing table in my web app. I’ll go ahead and funnel in the Google Firebase user id to the pricing table.
import React, { useState, useEffect } from 'react';
import { Dialog, DialogTitle, DialogContent } from '@mui/material';


import logger from "@/lib/logger";


const StripePricingTable = ({ user }) => {
 useEffect(() => {
   const script = document.createElement("script");
   script.src = "https://js.stripe.com/v3/pricing-table.js";
   script.async = true;
   document.body.appendChild(script);


   return () => {
     document.body.removeChild(script);
   };
 }, []);


 logger.debug("StripePricingTable user.uid: ", user.uid);


 return React.createElement("stripe-pricing-table", {
   "pricing-table-id": process.env.NEXT_PUBLIC_STRIPE_PRICING_TABLE_ID,
   "publishable-key": process.env.NEXT_PUBLIC_STRIPE_PUBLISHABLE_KEY,
   "client-reference-id": user.uid,
 });
};


const StripePlansDialog = ({ open, onClose, user }) => {
 return (
   <Dialog open={open} onClose={onClose} fullWidth maxWidth="lg">
     <DialogTitle>View Plans</DialogTitle>
     <DialogContent>
       <StripePricingTable user={user} />
     </DialogContent>
   </Dialog>
 );
};


export default StripePlansDialog;
Alright, so now that I am passing the user Id to the pricing table, when a user makes a purchase, I can see the value of the user Id getting logged in the checkout.session.completed event. Below is what the event object looks like with a good amount of the properties trimmed out since they are not very relevant. The property that matters to us is “client_reference_id”.
Event data: {
  id: 'cs_test_...',
  amount_total: 8499,
  cancel_url: 'https://stripe.com',
  client_reference_id: 'ClHemjvo...',
  created: 1704244228,
  customer: 'cus_PIuqCn...',
  customer_creation: 'always',
  customer_details: {
    address: {
      city: null,
      country: 'US',
      line1: null,
      line2: null,
      postal_code: '12121',
      state: null
    },
    email: 'whatever@gmail.com',
    name: 'Whatever',
    phone: null,\
  },
  customer_email: 'whatever@gmail.com',
  locale: 'en',
  mode: 'subscription',
  payment_method_types: [ 'card' ],
  payment_status: 'paid',
  status: 'complete',
  subscription: 'sub_1OUJ0RGUlyEIrGMQb3J27Dh0',
}
Ok, so I can access the Firebase User Id when the user completes the “Checkout Session”.
For context: when you integrate Stripe into your website or application, a Checkout Session is created to handle the details of the payment process, from presenting payment options to finalizing the transaction.
Let’s get to our Stripe Webhook we’ve implemented in NextJS. It’s currently logging events. Let’s add to it the logic to pick the user Firebase Id from the checkout.session.completed event and log it.
Let’s define a new method called “processStripeEventData” and call it from our webhook, right after we log the event.
await processStripeEventData(event);Let’s set a structure for processing events, where on the checkout.session.completed, we link Firebase User Id to Stripe customer Id, and for the 3 subscription events (created, updated, deleted), we “take note” of the user subscription change.
const checkoutCompleteEvent = "checkout.session.completed";
const subscriptionEvents = [
   "customer.subscription.created",
   "customer.subscription.updated",
   "customer.subscription.deleted"
];


async function processStripeEventData(stripeEvent) {
   try {
       // Example of logging
       console.log("Processing stripe event", { id: stripeEvent.id, type: stripeEvent.type });


       // If the event is a checkout complete event, map account to customer
       if (stripeEvent.type === checkoutCompleteEvent) {
           await recordCustomerAccountMappings(stripeEvent);
       }


       // If the event is subscription related, update the account subscription
       if (subscriptionEvents.includes(stripeEvent.type)) {
           await recordAccountSubscriptionChange(stripeEvent);
       }


   } catch (err) {
       // Handle errors, possibly logging them to your database
       console.error("Error processing Stripe event:", err);


       // Here you would record the error in your database
   }
}


async function recordCustomerAccountMappings(stripeEvent) {
   console.log("Mapping customer accounts", { id: stripeEvent.id, type: stripeEvent.type });


   const { customer, client_reference_id } = stripeEvent.data.object;
   if (customer && client_reference_id) {
       console.log("Mapping customer to account", { customer, client_reference_id });


       // Here you would update your database with the customer and account mapping
   }
}


async function recordAccountSubscriptionChange(stripeEvent) {
   console.log("Recording subscription change", { id: stripeEvent.id, type: stripeEvent.type });
}
After making a test purchase, I could see the following in the logs, and this confirms that I was able to find the “link” between the Stripe Customer Id and Firebase User Id.
Mapping customer to account {
  customer: 'cus_PJAfq…',
  client_reference_id: 'k1Vare…'
}
Data Model
Now that I can tap into the information that I need from Stripe events, it’s good to think a little bit about how I want to store the data in Firestore.
In my app, I currently store user accounts in the “users” collection. If I take the simplest approach possible, I could add a new “stripeId” property to the user document, and another “subscription” property to represent the subscription that the user has.
There is one catch here though. I’ve noticed the customer.subscription.created event happens before the checkout.session.completed event. So I need to keep the subscription information somewhere before I “find” the link between the Stripe customer and the Firebase user. Wait, but that information is stored in Stripe anyways, so I still have a way to talk to Stripe to look it up.
Firestore Database Setup
In order to be able to talk to Firestore from NextJS, we need to make sure first we have the right configuration.
Install Firebase Admin SDK
npm install firebase-adminGenerate a Firebase Service Account Key: Go to the Firebase Console. Select your project. Go to Project settings (gear icon near the top-left corner) > Service accounts. Click on “Generate new private key” and confirm. This will download a JSON file with your service account credentials.
Go to Firestore in Firebase console, and copy the database url from the browser address bar (format should be https://console.firebase.google.com/u/0/project/<project_Id>/firestore)
Create the lib/firebaseAdmin.ts to initialize Firebase on the server side
import admin from 'firebase-admin';


if (!admin.apps.length) {
 admin.initializeApp({
   credential: admin.credential.cert({
     projectId: process.env.FIREBASE_PROJECT_ID,
     clientEmail: process.env.FIREBASE_CLIENT_EMAIL,
     privateKey: process.env.FIREBASE_PRIVATE_KEY.replace(/\\n/g, '\n'),
   }),
   databaseURL: process.env.FIREBASE_DATABASE_URL,
 });
}


export default admin;
Make sure the environment variables are defined in your .env.local file.
Updating Firestore Database
Ok, now that we’ve set up Firebase integration on the backend, let’s listen to the Stripe events and make the database updates accordingly.
In the webhook.ts file, let’s reference the Firestore db object.
import admin from '@/lib/firebaseAdmin';

const db = admin.firestore();
Now, let’s update the recordCustomerAccountMappings function to write the stripeCustomerId property to the user document.
async function recordCustomerAccountMappings(stripeEvent) {
   console.log("Mapping customer accounts", { id: stripeEvent.id, type: stripeEvent.type });


   const { customer: stripeCustomerId, client_reference_id: userId } = stripeEvent.data.object;
   if (stripeCustomerId && userId) {
       console.log("Mapping customer to account", { stripeCustomerId, userId });


       const userRef = db.collection('users').doc(userId);


       try {
           await userRef.update({
               stripeId: stripeCustomerId
           });

           console.log("Mapped Stripe customer to user account", { userId, stripeCustomerId });
       } catch (err) {
           console.error("Error mapping Stripe customer to user account:", err);
           // Handle any errors here
       }
   }
}
Given the fact that customer.subscription.created event happens before the checkout.session.completed event, when I map the two, I should go look for customer subscription data in Stripe and make sure I have that updated in the User document.
Let’s reference Stripe from webhook.ts
import Stripe from 'stripe';


const stripe = new Stripe(process.env.STRIPE_SECRET_KEY, { apiVersion: '2023-10-16' });
Let’s add a new method to be called from recordCustomerAccountMappings that pulls the Stripe customer existing subscriptions and maps it to what we want to know about at the end of the day: what active subscription does the user have!
async function updateUserSubscriptionPlan(userRef, stripeCustomerId) {
try {
// Fetch the latest subscription for the user from Stripe
const subscriptions = await stripe.subscriptions.list({
customer: stripeCustomerId,
status: 'active',
limit: 1
});
const userSubscription = subscriptions.data[0];
console.log("Fetched user subscription data", { userSubscription });
if (userSubscription) {
const planProductId = userSubscription.items.data[0].plan.product;
console.log("Fetched user subscription plan ID", { planProductId });
// Determine the plan type ("free" or "pro")
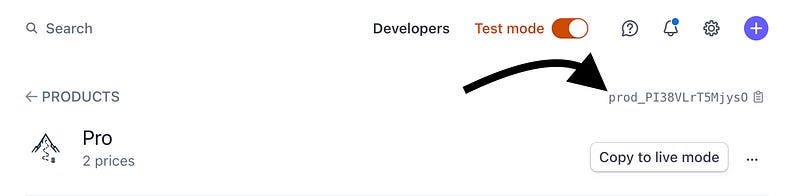
const planType = (planProductId === 'prod_PI38VLrT5MjysO') ? 'pro' : 'free';
// Update the user document with the subscription plan
await userRef.update({ subscriptionPlan: planType });
console.log("Updated user subscription data", { subscriptionPlan: planType });
} else {
// If there is no subscription, set the plan to "free"
await userRef.update({ subscriptionPlan: 'free' });
console.log("Updated user subscription data", { subscriptionPlan: 'free' });
}
} catch (err) {
console.error("Error in updateUserSubscriptionPlan:", err);
// Handle any errors here
}
}Replace ‘prod_PI38VLrT5MjysO’ with your product’s plan id (In Test mode).
Next, let’s update the recordAccountSubscriptionChange function to pick up the subscription state changes.
async function recordAccountSubscriptionChange(stripeEvent) {
   console.log("Recording subscription change", { id: stripeEvent.id, type: stripeEvent.type });


   const { customer: stripeCustomerId, id: subscriptionId, status, plan } = stripeEvent.data.object;
   console.log("Subscription change data", { stripeCustomerId, subscriptionId, status, plan });


   try {
       const usersRef = db.collection('users');
       const querySnapshot = await usersRef.where('stripeId', '==', stripeCustomerId).get();


       if (querySnapshot.empty) {
           throw new Error(`User not found for Stripe customer ID ${stripeCustomerId}`);
       }


       const userRef = querySnapshot.docs[0].ref;


       // Call updateUserSubscriptionPlan to handle the subscription update
       await updateUserSubscriptionPlan(userRef, stripeCustomerId);


       console.log("Handled user subscription update", { stripeCustomerId });


   } catch (err) {
       console.error("Error in recordAccountSubscriptionChange:", err);
       // Handle any errors here
   }
}
At this point, in theory, we should have all the changes we need to “sync” with Stripe on all the user payments and subscription changes.
Let’s test and make sure all the user actions map to the Firestore DB in the way we desire them to.
I just completed a purchase for a “Pro” subscription, and the User document has the stripeId updated but the subscriptionPlan is “pro”. Awesome!
I’ll then test out changing the plan from “Pro” to “Free” and then back from “Free” to “Pro”. Amazing, it works!
However, when I “cancel” the subscription, it is still considered “pro”. This is because on cancellation, the subscription will get scheduled to be canceled at the end of the billing period.
In order to simulate an actual cancellation, I’ll go ahead and delete the customer from Stripe (Go to customers, select the user and delete). Now that it is done, the user’s subscription plan is “free”, which is exactly what I’d expect.
The “stripeId” field is still set on the User object. That’s fine, but I want to make sure that if the same Firebase user comes back and makes a purchase, a new customer id is generated and updated in the User’s document. And it’s just what I expected, awesome!
Check User Subscription Status
When a user has purchased the “pro” plan, the property subscriptionPlan in the users/{userId} doc in Firestore will be set to “pro”.
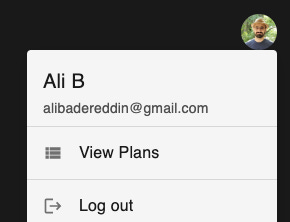
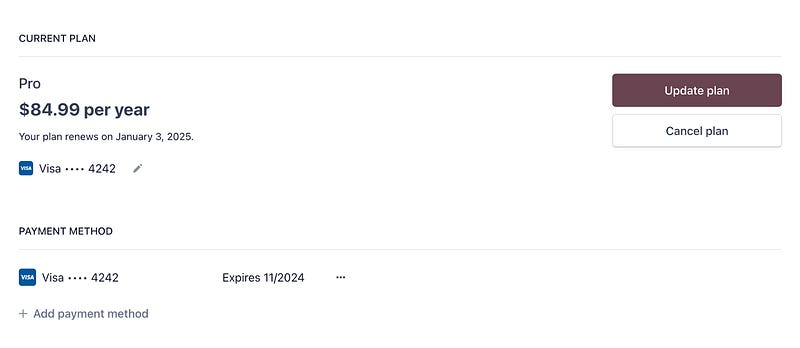
The first thing I want to change in my app is the user menu. It currently shows a “View Plan” that when clicked will show the pricing table. If the user has already purchased the “pro” plan, I want to hide that option and show a “Manage Plan” menu item, that when clicked takes the user directly to the Stripe Customer Portal.
To make the access to the “pro” status reusable in my app, I will define a React hook under lib/hooks/useSubscriptionStatus to return a boolean whether the user has the pro plan or not.
import { useState, useEffect } from 'react';
import { getFirestore, doc, onSnapshot } from 'firebase/firestore';


const useSubscriptionStatus = (userId: string) => {
 const [hasProPlan, setHasProPlan] = useState(false);
 const firestore = getFirestore();


 useEffect(() => {
   if (!userId) return; // Ensure there is a userId before proceeding


   // Reference to the specific user document
   const userRef = doc(firestore, 'users', userId);


   // Listen for changes in real-time
   const unsubscribe = onSnapshot(userRef, (documentSnapshot) => {
     if (documentSnapshot.exists()) {
       // Check the 'subscriptionPlan' field to determine if the user has a 'pro' plan
       const userData = documentSnapshot.data();
       const subscriptionPlan = userData.subscriptionPlan;
       setHasProPlan(subscriptionPlan === 'pro');
     } else {
       // Handle the case where the document does not exist
       setHasProPlan(false);
     }
   });


   // Cleanup listener on unmount
   return () => unsubscribe();
 }, [userId, firestore]);


 return hasProPlan;
};


export default useSubscriptionStatus;
When the user clicks on “Manage Plan”, I want to route them to the Stripe Customer Portal. According to Stripe documentation, we can use a prefilled_email URL parameter in the query string of our login link URL to streamline the login experience.
Example login link:
https://billing.stripe.com/p/login/test_4gw6oJchs69w47e7ss?prefilled_email=jenny%40example.com
In my React component, I reference the React hook and within the component I retrieve the boolean that tells whether the user has a Pro plan.
import useSubscriptionStatus from '@/lib/hooks/useSubscriptionStatus';

const hasProPlan = useSubscriptionStatus(user?.uid);
Then accordingly, I display “Manage Plan” or “View Plans”.
{hasProPlan ? (
 <StyledMenuItem onClick={handleManagePlan}>
   <ListItemIcon>
     <SettingsIcon fontSize="small" />
   </ListItemIcon>
   Manage Plan
 </StyledMenuItem>
) : (
 <StyledMenuItem onClick={handleViewPlans}>
   <ListItemIcon>
     <ViewListIcon fontSize="small" />
   </ListItemIcon>
   View Plans
 </StyledMenuItem>
)}
And here is the logic for managing the plan. I got the portal url from Stripe and stored it as an environment variable given that there are separate links for Test vs Live modes..
const handleManagePlan = () => {
 // Get the base URL from the environment variable
 const portalBaseUrl = process.env.NEXT_PUBLIC_STRIPE_CUSTOMER_PORTAL_BASE_URL;


 if (!portalBaseUrl) {
   console.error("Stripe Customer Portal URL is not set.");
   // Handle the error appropriately
   return;
 }


 // Construct the URL
 const portalUrl = user?.email
   ? `${portalBaseUrl}?prefilled_email=${encodeURIComponent(user.email)}`
   : portalBaseUrl;


 // Open the URL in a new window/tab
 window.open(portalUrl, '_blank');
};
Launching to Production
Environment Variables & NextJS Vercel Deployment
Since I am using Vercel, which by the way, is the best platform I’ve ever seen for simplified CI/CD, going to production will be as simple as merging my code into the main branch and adding the new environment variables.
For a refresher, below is the list of environment variables that need to be defined.
Firebase
Go to the Firebase Console, select your project, go to Project settings (gear icon near the top-left corner) > Service accounts, and if you have not already done so, click on “Generate new private key” and confirm. This will download a JSON file with your service account credentials. Take those values from the JSON file and set them for the following environment variables.
FIREBASE_PROJECT_ID
FIREBASE_CLIENT_EMAIL
FIREBASE_PRIVATE_KEY
For the FIREBASE_DATABASE_URL environment variable, go to Firestore in Firebase console, and copy the database url from the browser address bar (format should be https://console.firebase.google.com/u/0/project/<project_Id>/firestore).
Stripe
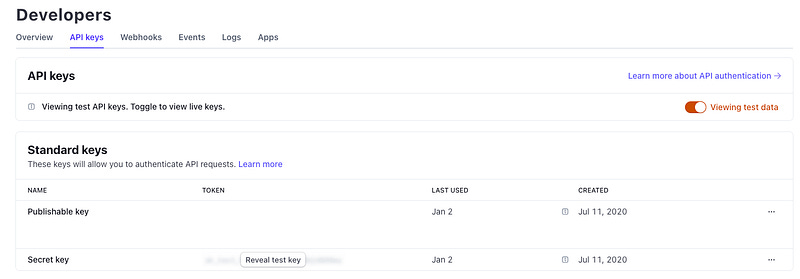
NEXT_PUBLIC_STRIPE_PRICING_TABLE_ID: get it from pricing table code snippet at /pricing-tables in Stripe dashboard.
NEXT_PUBLIC_STRIPE_PUBLISHABLE_KEY: get it from pricing table code snippet at /pricing-tables in Stripe dashboard.
NEXT_PUBLIC_STRIPE_CUSTOMER_PORTAL_BASE_URL: From settings/billing/portal in Stripe dashboard.
STRIPE_WEBHOOK_SECRET: from /webhooks in Stripe dashboard.
Stripe Webhook Staging & Production Endpoints Setup
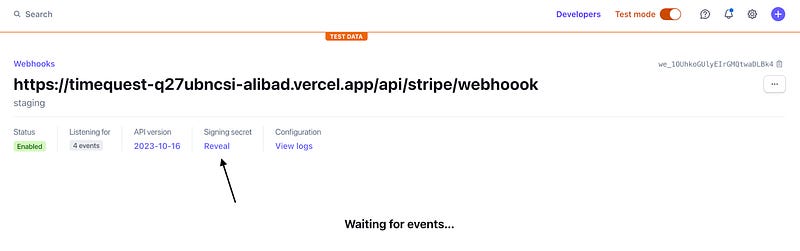
After deployment of all our changes to the staging environment, let’s point the Stripe Hosted Endpoint for webhooks in the Stripe Dashboard to the NextJS API endpoint in the staging environment.
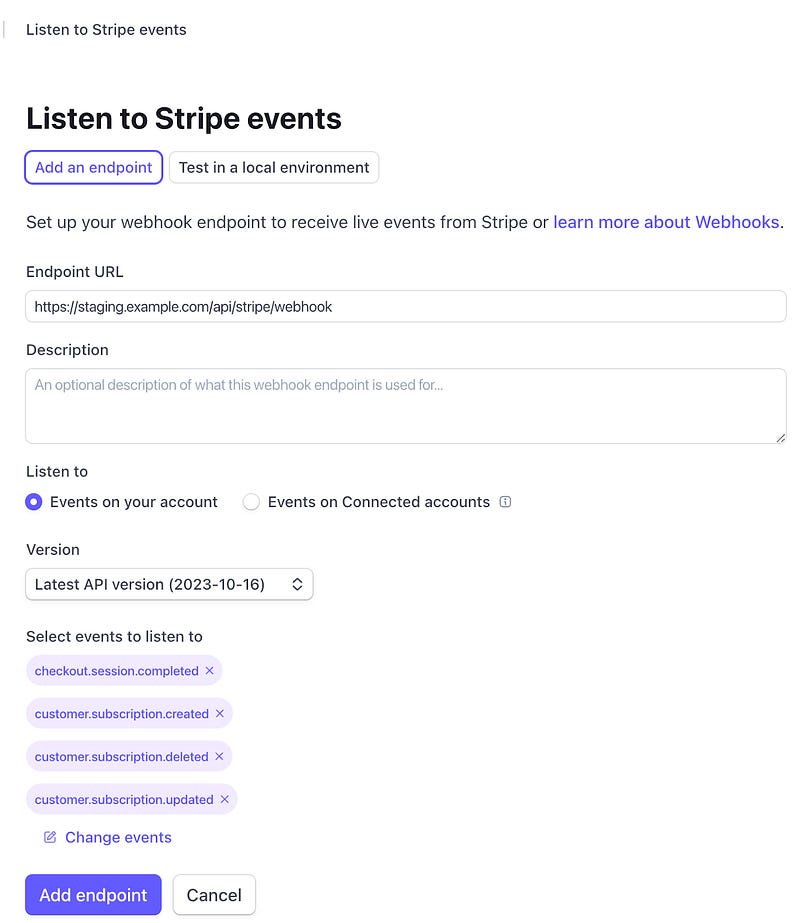
Point to the endpoint and make sure to select the relevant events we are listening to. After adding the endpoint, copy the secret into the staging environment STRIPE_WEBHOOK_SECRET environment variable.
One interesting thing is that you will need to re-deploy in staging after adding a new environment variable, and when you re-deploy in Vercel in staging, a new subdomain url is generated. Instead of adding a new endpoint in Stripe, just go and update the current endpoint.
Now, let’s go to the staging environment and make sure everything works as expected.
You should start seeing events funneling in. But for some reason, my NextJS endpoint hosted on the Vercel staging environment was returning an HTTP 401 (Unauthorized) response.
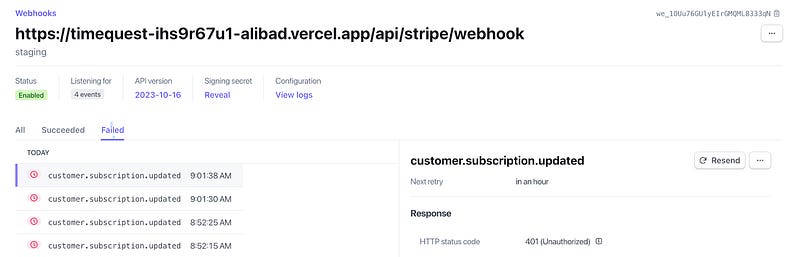
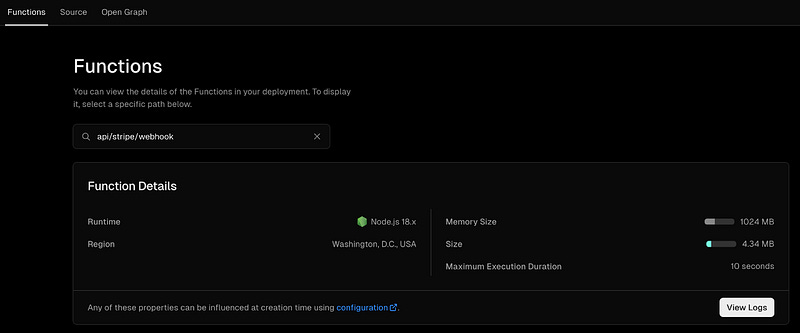
Looking at the Function logs in Vercel, there really wasn’t much being logged, not even the ‘Received Stripe webhook’ I logged at the very start of the webhook handler.
Wondering if this is some Vercel staging crap I am dealing with, I decided to add the production endpoint in Stripe for the webhook (make sure you are not in Test mode), pull the STRIPE_WEBHOOK_SECRET and add the environment variable for production, then merge to the main branch to kick deployment to production.
Testing in production, I got a 400 Bad Request, but at least it’s some useful error message I could do something about.
Webhook Error: No signatures found matching the expected signature for payload. Are you passing the raw request body you received from Stripe?
Learn more about webhook signing and explore webhook integration examples for various frameworks at https://github.com/stripe/stripe-node#webhook-signing
I started thinking, maybe the Production deployment didn’t pick up the STRIPE_WEBHOOK_SECRET environment variable that I’ve set. So I just validated it was set correctly and redeployed.
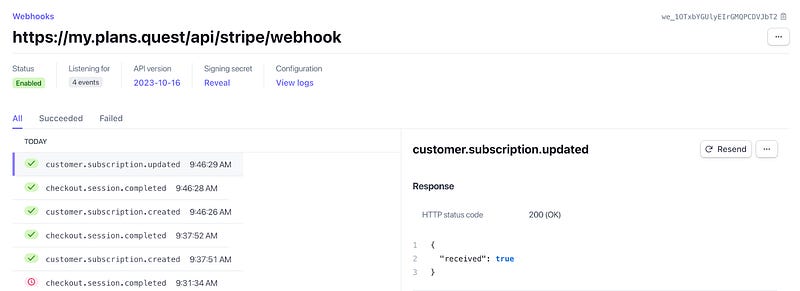
And yes, a good kind of magic started happening.
One last catch, I realized hard coding caused a broken purchase experience in production.
// Determine the plan type ("free" or "pro")
const planType = (planProductId === 'prod_PI38VLrT5MjysO') ? 'pro' : 'free';
So I made sure the PRO Plan Product ID is also an environment variable.
const planType = (planProductId === process.env.NEXT_PUBLIC_STRIPE_PRO_PLAN_PRODUCT_ID) ? 'pro' : 'free';Conclusion
The key takeaway from this experience is the importance of starting in “Test Mode” in Stripe, which allows for a smoother transition to “Live” mode. Additionally, the limitations encountered, such as the inability to modify certain aspects of the pricing table, impacted the effectiveness of my app’s payment user experience.
For developers embarking on a similar path, my advice is to pay close attention to the details of integration, especially when it comes to linking Stripe’s payment functionalities with your app’s user management system. The use of Stripe webhooks is crucial for tracking subscription statuses and reflecting these changes in your app. Also, consider not using the Pricing table to have more flexibility in your payment UI.
Finally, I have some recommendations to the Stripe team:
Since you allow the user to pass the “client-reference-id” to the pricing table, consider storing that into the Customer object in Stripe and automatically detecting the plan that the user has subscribed to when rendering the pricing table.
Currently, you only allow one product to have a custom link. In my case, I had free, pro and pioneer plans. I only wanted the user to make a “purchase” on the “pro” plan, to contact me on the “pioneer” plan and to either “Donate” on the “free” plan or just not have a button there at all.
On my marketing website, I thought it would be a good idea to include the pricing table. However, I later realized that exposing the “Subscribe” buttons on the marketing website from the pricing table would have the user purchase without being logged in. That’s fine if we could rely on emails to link accounts, but it turns out Stripe does not enforce unique emails. For new Stripe accounts, it would be nice to enforce unique emails by default, and then let your customers change that if needed.
Since I already put the effort into building the pricing table, it would have been really nice if I were able to expose it on the marketing website in “Info” mode, where there are either no buttons, or full ability to customize the link in all the buttons.
Seeing all the Stripe Webhook events was overwhelming. I didn’t know which ones I should really care about. It would be nice to have “contextual” documentation based on the structure of the pricing plan, from which you would recommend the most relevant events to listen to. In my case, there were only 4 events.
I created the pricing table in production mode first, then had to re-create everything in Test mode. Although there is an option to copy a product from Test mode to Live mode, there is no option to copy the Pricing table. It would be nice to be able to copy from Test to Live and Live to Test both products and pricing tables.
There are so many secrets and IDs to pick from different parts of the UI and plug them into environment variables. It would be nice if that process is streamlined a bit more.
Some random bugs I’ve experienced:
The “Continue” button was disabled in the pricing table because some field was missing. It was not visible in the UI why the “Continue” button was disabled, so I thought it’s an issue in the pricing table itself.
In the webhook endpoint description, you cannot type “ “ (space key) in the keyboard! I literally thought my keyboard space key was not working.
In closing, I hope these suggestions serve as constructive feedback for the Stripe team. My experience integrating Stripe’s pricing table has been both challenging and rewarding, and I believe these enhancements could further streamline the process for developers like myself. I look forward to seeing how Stripe evolves and adapts to these suggestions, and I am excited about the prospect of even more seamless integrations in the future.